Spring Batch Example
Table of Contents
I’m going to show you exactly how to create a Spring Batch Hello World example that uses Spring Boot.
(Step-by-step)
So if you’re a Spring Batch beginner, you’ll love this guide.
Ready?
How Does the Spring Batch Framework Work? #
Before we dive into the code let’s look at the Spring Batch framework. It contains the following key building blocks:

A batch process consists of a Job. This is an entity that encapsulates the entire batch process.
A Job can consist of one or more Steps. In most cases, a step will read data (via an ItemReader), process it (using an ItemProcessor) and then write it (via an ItemWriter).
The JobLauncher handles launching a Job.
And finally the JobRepository stores metadata about configured and executed Jobs.
To show how Spring Batch works let’s build a simple Hello World batch job.
In the example, we read a person’s first and last name from a person.csv file. From this data, a greeting is generated. This greeting is then written to a greetings.txt file.
General Project Overview #
We will use the following tools/frameworks:
- Spring Batch 4.1
- Spring Boot 2.1
- Maven 3.6
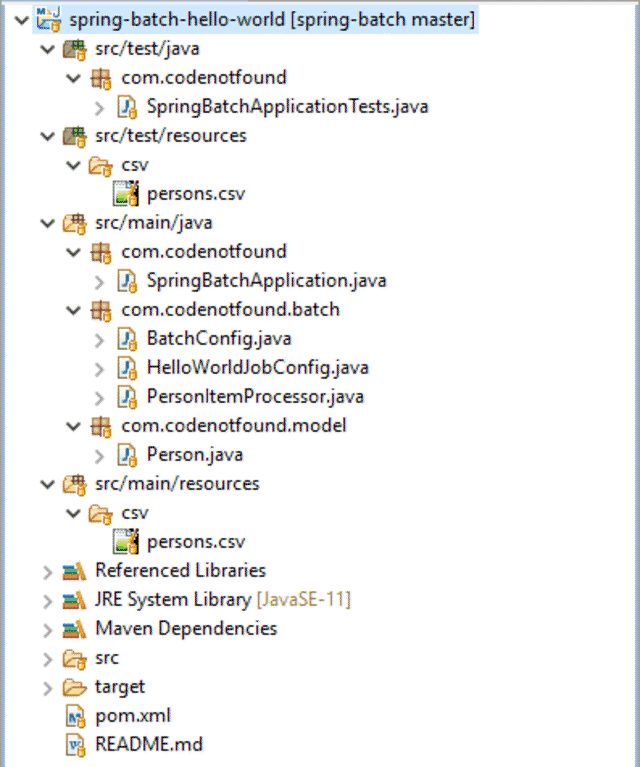
Our project has the following directory structure:
Maven Setup #
We build and run our example using Maven. If not already the case, download and install Apache Maven.
Let’s use Spring Initializr to generate our Maven project. Make sure to select Batch as a dependency.

Click Generate Project to generate and download the Spring Boot project template. At the root of the project, you’ll find a pom.xml file which is the XML representation of the Maven project.
To avoid having to manage the version compatibility of the different Spring dependencies, we will inherit the defaults from the spring-boot-starter-parent parent POM.
The generated project contains Spring Boot Starters that manage the different Spring dependencies.
The spring-boot-starter-batch starter imports the Spring Boot and Spring Batch dependencies.
The spring-boot-starter-test starter includes the dependencies for testing Spring Boot applications. It imports libraries that include JUnit, Hamcrest and Mockito.
There is also a dependency on spring-batch-test. This library contains some helper classes that will help test the batch job.
In the plugins section, you’ll find the Spring Boot Maven Plugin: spring-boot-maven-plugin. It allows us to build a single, runnable “uber-jar”. This is a convenient way to execute and transport code. Also, the plugin allows you to start the example via a Maven command.
<?xml version="1.0" encoding="UTF-8"?>
<project xmlns="http://maven.apache.org/POM/4.0.0"
  xmlns:xsi="http://www.w3.org/2001/XMLSchema-instance"
  xsi:schemaLocation="http://maven.apache.org/POM/4.0.0 http://maven.apache.org/xsd/maven-4.0.0.xsd">
  <modelVersion>4.0.0</modelVersion>

  <groupId>com.codenotfound</groupId>
  <artifactId>spring-batch-hello-world</artifactId>
  <version>0.0.1-SNAPSHOT</version>
  <packaging>jar</packaging>

  <name>spring-batch-hello-world</name>
  <description>Spring Batch Hello World Example</description>
  <url>https://codenotfound.com/spring-batch-example.html</url>

  <parent>
    <groupId>org.springframework.boot</groupId>
    <artifactId>spring-boot-starter-parent</artifactId>
    <version>2.1.5.RELEASE</version>
    <relativePath /> <!-- lookup parent from repository -->
  </parent>

  <properties>
    <java.version>11</java.version>
  </properties>

  <dependencies>
    <dependency>
      <groupId>org.springframework.boot</groupId>
      <artifactId>spring-boot-starter-batch</artifactId>
    </dependency>
    <dependency>
      <groupId>org.springframework.boot</groupId>
      <artifactId>spring-boot-starter-test</artifactId>
      <scope>test</scope>
    </dependency>
    <dependency>
      <groupId>org.springframework.batch</groupId>
      <artifactId>spring-batch-test</artifactId>
      <scope>test</scope>
    </dependency>
  </dependencies>

  <build>
    <plugins>
      <plugin>
        <groupId>org.springframework.boot</groupId>
        <artifactId>spring-boot-maven-plugin</artifactId>
      </plugin>
    </plugins>
  </build>

</project>
Spring Boot Setup #
We use Spring Boot so that we have a Spring Batch application that you can “just run”. Start by creating a SpringBatchApplication class. It contains the main() method that uses Spring Boot’s SpringApplication.run() to launch the application.
Note that
@SpringBootApplicationis a convenience annotation that adds:@Configuration,@EnableAutoConfiguration, and@ComponentScan.
For more information on Spring Boot, check the Spring Boot getting started guide.
Spring Batch by default uses a database to store metadata on the configured batch jobs.
In this example, we will run Spring Batch without a database. Instead, an in-memory Map based repository is used.
The
spring-boot-starter-batchstarter has a dependency onspring-boot-starter-jdbcand will try to instantiate a datasource. Addexclude = {DataSourceAutoConfiguration.class}to the@SpringBootApplicationannotation. This prevents Spring Boot from auto-configuring aDataSourcefor database connections.
package com.codenotfound;

import org.springframework.boot.SpringApplication;
import org.springframework.boot.autoconfigure.SpringBootApplication;
import org.springframework.boot.autoconfigure.jdbc.DataSourceAutoConfiguration;

@SpringBootApplication(exclude = {DataSourceAutoConfiguration.class})
public class SpringBatchApplication {

  public static void main(String[] args) {
    SpringApplication.run(SpringBatchApplication.class, args);
  }
}
Creating the Model #
Before you process data it is generally expected that you map it to a domain object.
In our example, the input data is stored in a src/test/resources/csv/persons.csv file.
Each line in the file contains a comma-separated first and last name.
John, Doe
Jane, Doe
We will map this data to a Person object. This is a simple POJO that contains a first and last name.
package com.codenotfound.model;

public class Person {
  private String firstName;
  private String lastName;

  public Person() {
    // default constructor
  }

  public String getFirstName() {
    return firstName;
  }

  public void setFirstName(String firstName) {
    this.firstName = firstName;
  }

  public String getLastName() {
    return lastName;
  }

  public void setLastName(String lastName) {
    this.lastName = lastName;
  }

  @Override
  public String toString() {
    return firstName + " " + lastName;
  }
}
Configuring the Spring Batch Job #
We start by creating a BatchConfig class that will configure Spring Batch. The @Configuration annotation at the top of the class indicates that Spring can use this class as a source of bean definitions.
We add the @EnableBatchProcessing annotation which enables all needed Spring Batch features. It also provides a base configuration for setting up batch jobs.
By adding this annotation a lot happens. Here is an overview of what
@EnableBatchProcessingcreates:
- a
JobRepository(bean name “jobRepository”) - a
JobLauncher(bean name “jobLauncher”) - a
JobRegistry(bean name “jobRegistry”) - a
JobExplorer(bean name “jobExplorer”) - a
PlatformTransactionManager(bean name “transactionManager”) - a
JobBuilderFactory(bean name “jobBuilders”) as a convenience to prevent you from having to inject the job repository into every job - a
StepBuilderFactory(bean name “stepBuilders”) as a convenience to prevent you from having to inject the job repository and transaction manager into every step
For Spring Batch to use a Map based JobRepository we need to extend the DefaultBatchConfigurer. Override the setDataSource() method to not set a DataSource. This will cause the auto-configuration to use a Map based JobRepository.
package com.codenotfound.batch;

import javax.sql.DataSource;
import org.springframework.batch.core.configuration.annotation.DefaultBatchConfigurer;
import org.springframework.batch.core.configuration.annotation.EnableBatchProcessing;
import org.springframework.context.annotation.Configuration;

@Configuration
@EnableBatchProcessing
public class BatchConfig extends DefaultBatchConfigurer {

  @Override
  public void setDataSource(DataSource dataSource) {
    // initialize will use a Map based JobRepository (instead of database)
  }
}
Now let’s go ahead and configure our Hello World Spring Batch job.
Create a HelloWorldJobConfig configuration class and annotate it with @Configuration.
In the helloWorlJob Bean, we use the JobBuilderFactory to create the job. We pass the name of the job and the step that needs to be run.
Note that Spring will automatically wire the
jobBuildersandstepBuildersBeans in thehelloWorlJob()Bean.
The helloWorldStep Bean defines the different items our step executes. We use the StepBuilderFactory to create the step.
First, we pass the name of the step. Using chunk() we specify the number of items that are processed within each transaction. Chunk also specifies the input (Person) and output (String) type of the step. We then add the ItemReader (reader), ItemProcessor (processor), and ItemWriter (writer) to the step.
To read the person CSV file we use the FlatFileItemReader. This is a class that provides basic functionality to read and parse flat files.
There is a FlatFileItemReaderBuilder builder implementation that allows us to create a FlatFileItemReader. We start by specifying that the result of reading each line in the file is a Person object. We then add a name to the reader and the specify the resource (in this case the persons.csv file) that needs to be read.
In order for the FlatFileItemReader to process our file, we need to specify some extra information. First, we define that the data in the file is delimited (defaults to comma as its delimiter).
We also specify how each field on a line needs to be mapped to our Person object. This is done using names() that enables Spring Batch to map fields by matching a name with a setter on the object. So in our example, the first field of a line will be mapped using the firstName setter. For this to work, we also need to specify the target type which is a Person object.
The PersonItemProcessor handles the processing of the data. It converts a Person into a greeting String. We will define this in a separate class further below.
Once the data is processed we will write it to a text file. We use the FlatFileItemWriter to help us with this task.
We use a FlatFileItemWriterBuilder builder implementation to create a FlatFileItemWriter. We add a name for the writer and specify the resource (in this case the greeting.txt file) to which data needs to be written.
The FlatFileItemWriter needs to know how to turn our generated output into a single string that can be written to a file. As in this example, our output is already a string we can use the PassThroughLineAggregator. This is the most basic implementation, which assumes that the object is already a string.
package com.codenotfound.batch;

import org.springframework.batch.core.Job;
import org.springframework.batch.core.Step;
import org.springframework.batch.core.configuration.annotation.JobBuilderFactory;
import org.springframework.batch.core.configuration.annotation.StepBuilderFactory;
import org.springframework.batch.item.file.FlatFileItemReader;
import org.springframework.batch.item.file.FlatFileItemWriter;
import org.springframework.batch.item.file.builder.FlatFileItemReaderBuilder;
import org.springframework.batch.item.file.builder.FlatFileItemWriterBuilder;
import org.springframework.batch.item.file.transform.PassThroughLineAggregator;
import org.springframework.context.annotation.Bean;
import org.springframework.context.annotation.Configuration;
import org.springframework.core.io.ClassPathResource;
import org.springframework.core.io.FileSystemResource;
import com.codenotfound.model.Person;

@Configuration
public class HelloWorldJobConfig {

  @Bean
  public Job helloWorlJob(JobBuilderFactory jobBuilders,
      StepBuilderFactory stepBuilders) {
    return jobBuilders.get("helloWorldJob")
        .start(helloWorldStep(stepBuilders)).build();
  }

  @Bean
  public Step helloWorldStep(StepBuilderFactory stepBuilders) {
    return stepBuilders.get("helloWorldStep")
        .<Person, String>chunk(10).reader(reader())
        .processor(processor()).writer(writer()).build();
  }

  @Bean
  public FlatFileItemReader<Person> reader() {
    return new FlatFileItemReaderBuilder<Person>()
        .name("personItemReader")
        .resource(new ClassPathResource("csv/persons.csv"))
        .delimited().names(new String[] {"firstName", "lastName"})
        .targetType(Person.class).build();
  }

  @Bean
  public PersonItemProcessor processor() {
    return new PersonItemProcessor();
  }

  @Bean
  public FlatFileItemWriter<String> writer() {
    return new FlatFileItemWriterBuilder<String>()
        .name("greetingItemWriter")
        .resource(new FileSystemResource(
            "target/test-outputs/greetings.txt"))
        .lineAggregator(new PassThroughLineAggregator<>()).build();
  }
}
Processing the Data #
In most cases, you will want to apply some data processing during a batch job. An ItemProcessor allows you to do just that.
In our example, we convert a Person object into a simple greeting String.
To do so, we create a PersonItemProcessor that implements the ItemProcessor interface. We implement the process() method which adds the first and last name of a person to a string.
For debugging purposes, we also log the result.
package com.codenotfound.batch;

import org.slf4j.Logger;
import org.slf4j.LoggerFactory;
import org.springframework.batch.item.ItemProcessor;
import com.codenotfound.model.Person;

public class PersonItemProcessor
    implements ItemProcessor<Person, String> {

  private static final Logger LOGGER =
      LoggerFactory.getLogger(PersonItemProcessor.class);

  @Override
  public String process(Person person) throws Exception {
    String greeting = "Hello " + person.getFirstName() + " "
        + person.getLastName() + "!";

    LOGGER.info("converting '{}' into '{}'", person, greeting);
    return greeting;
  }
}
Testing the Spring Batch Example #
To wrap up our example we create a basic unit test case. It will run the batch job and check if it finishes successfully.
We use the @RunWith and @SpringBootTest testing annotations to tell JUnit to run using Spring’s testing support and bootstrap with Spring Boot’s support.
Spring Batch ships with a JobLauncherTestUtils utility class for testing batch jobs.
We first create an inner BatchTestConfig class that adds our helloWorld job to a JobLauncherTestUtils bean. Then use the launchJob() method of this bean to run the batch job.
If the job executed without any errors, the value of the exit code is COMPLETED.
package com.codenotfound;

import static org.assertj.core.api.Assertions.assertThat;
import org.junit.Test;
import org.junit.runner.RunWith;
import org.springframework.batch.core.Job;
import org.springframework.batch.core.JobExecution;
import org.springframework.batch.core.launch.NoSuchJobException;
import org.springframework.batch.test.JobLauncherTestUtils;
import org.springframework.beans.factory.annotation.Autowired;
import org.springframework.boot.test.context.SpringBootTest;
import org.springframework.context.annotation.Bean;
import org.springframework.context.annotation.Configuration;
import org.springframework.context.annotation.Import;
import org.springframework.test.context.junit4.SpringRunner;
import com.codenotfound.batch.job.BatchConfig;
import com.codenotfound.batch.job.HelloWorldJobConfig;

@RunWith(SpringRunner.class)
@SpringBootTest(
    classes = {SpringBatchApplicationTests.BatchTestConfig.class})
public class SpringBatchApplicationTests {

  @Autowired
  private JobLauncherTestUtils jobLauncherTestUtils;

  @Test
  public void testHelloWorldJob() throws Exception {
    JobExecution jobExecution = jobLauncherTestUtils.launchJob();
    assertThat(jobExecution.getExitStatus().getExitCode())
        .isEqualTo("COMPLETED");
  }

  @Configuration
  @Import({BatchConfig.class, HelloWorldJobConfig.class})
  static class BatchTestConfig {

    @Autowired
    private Job helloWorlJob;

    @Bean
    JobLauncherTestUtils jobLauncherTestUtils()
        throws NoSuchJobException {
      JobLauncherTestUtils jobLauncherTestUtils =
          new JobLauncherTestUtils();
      jobLauncherTestUtils.setJob(helloWorlJob);

      return jobLauncherTestUtils;
    }
  }
}
To trigger the above test case, open a command prompt in the project root folder and execute the following Maven command:
mvn test
The result is a successful build during which the batch job is executed.
 .   ____          _            __ _ _
/\\ / ___'_ __ _ _(_)_ __  __ _ \ \ \ \
( ( )\___ | '_ | '_| | '_ \/ _` | \ \ \ \
\\/  ___)| |_)| | | | | || (_| |  ) ) ) )
 '  |____| .__|_| |_|_| |_\__, | / / / /
=========|_|==============|___/=/_/_/_/
:: Spring Boot ::        (v2.1.5.RELEASE)

2019-05-30 19:11:12.784  INFO 14588 --- [           main] c.c.SpringBatchApplicationTests          : Starting SpringBatchApplicationTests on DESKTOP-2RB3C1U with PID 14588 (started by Codenotfound in C:\Users\Codenotfound\repos\spring-batch\spring-batch-hello-world)
2019-05-30 19:11:12.785  INFO 14588 --- [           main] c.c.SpringBatchApplicationTests          : No active profile set, falling back to default profiles: default
2019-05-30 19:11:13.305  WARN 14588 --- [           main] o.s.b.c.c.a.DefaultBatchConfigurer       : No datasource was provided...using a Map based JobRepository
2019-05-30 19:11:13.306  WARN 14588 --- [           main] o.s.b.c.c.a.DefaultBatchConfigurer       : No transaction manager was provided, using a ResourcelessTransactionManager
2019-05-30 19:11:13.328  INFO 14588 --- [           main] o.s.b.c.l.support.SimpleJobLauncher      : No TaskExecutor has been set, defaulting to synchronous executor.
2019-05-30 19:11:13.350  INFO 14588 --- [           main] c.c.SpringBatchApplicationTests          : Started SpringBatchApplicationTests in 0.894 seconds (JVM running for 1.777)
2019-05-30 19:11:13.732  INFO 14588 --- [           main] o.s.b.c.l.support.SimpleJobLauncher      : Job: [SimpleJob: [name=helloWorldJob]] launched with the following parameters: [{random=459672}]
2019-05-30 19:11:13.759  INFO 14588 --- [           main] o.s.batch.core.job.SimpleStepHandler     : Executing step: [helloWorldStep]
2019-05-30 19:11:13.812  INFO 14588 --- [           main] c.c.batch.PersonItemProcessor            : converting 'John Doe' into 'Hello John Doe!'
2019-05-30 19:11:13.822  INFO 14588 --- [           main] c.c.batch.PersonItemProcessor            : converting 'Jane Doe' into 'Hello Jane Doe!'
2019-05-30 19:11:13.842  INFO 14588 --- [           main] o.s.b.c.l.support.SimpleJobLauncher      : Job: [SimpleJob: [name=helloWorldJob]] completed with the following parameters: [{random=459672}] and the following status: [COMPLETED]
[INFO] Tests run: 1, Failures: 0, Errors: 0, Skipped: 0, Time elapsed: 1.953 s - in com.codenotfound.SpringBatchApplicationTests
[INFO]
[INFO] Results:
[INFO]
[INFO] Tests run: 1, Failures: 0, Errors: 0, Skipped: 0
[INFO]
[INFO] ------------------------------------------------------------------------
[INFO] BUILD SUCCESS
[INFO] ------------------------------------------------------------------------
[INFO] Total time:  6.852 s
[INFO] Finished at: 2019-05-30T19:11:14+02:00
[INFO] ------------------------------------------------------------------------
You can find the result in the target/test-outputs/greetings.txt file:
Hello John Doe!
Hello Jane Doe!
In this getting started tutorial you learned how to create a simple Spring Batch example with Spring Boot and Maven.
Let me know if you liked this post.
Leave a comment below.
Thanks!