gRPC Java Example
Table of Contents
I’m going to show you how to create a gRPC Java Hello World example that uses Maven and Spring Boot.
(Step-by-step)
So if you’re new to gRPC, you’ll love this guide.
Let’s dive right in.
What Is gRPC? #
gRPC is a high performance, open-source universal RPC framework. By default it uses Protocol Buffers to define exposed services.
The framework provides features such as bidirectional streaming and has support for many different programming languages.
gRPC was initially developed at Google and is now licensed under Apache 2.0.
To show how gRPC works let’s build a client and corresponding server that exposes a simple Hello World gRPC service.
Defining a Service Using Protocol Buffers #
gRPC services are defined using protocol buffers. These are Google’s language-neutral, platform-neutral, extensible mechanism for serializing structured data.
You specify how you want the information you’re serializing to be structured by defining protocol buffer message types in .proto files. Each protocol buffer message is a small logical record of information, containing a series of name-value pairs.
For this example, we define a first message containing information about a Person and a second message containing a Greeting. Both are then used in a sayHello() RPC method that takes the person message from the client and returns a greeting from the server.
We also define the version of the protocol buffers language that is used (proto3) in addition to package name and an option that enables the generation of separate files for different classes.
For more information check the protocol buffers language guide.
The below protocol buffer file is stored in src/main/proto/HelloWorld.proto.
syntax = "proto3";

option java_multiple_files = true;
package com.codenotfound.grpc.helloworld;

message Person {
  string first_name = 1;
  string last_name = 2;
}

message Greeting {
  string message = 1;
}

service HelloWorldService {
  rpc sayHello (Person) returns (Greeting);
}
Now that we have defined how the data is structured we need to generate source code that allows us to easily write and read protobuf messages using Java. We will do this in the next section using a Maven plugin.
General Project Setup #
We will use the following tools/frameworks:
- gRPC 1.16
- Spring Boot 2.1
- Maven 3.5
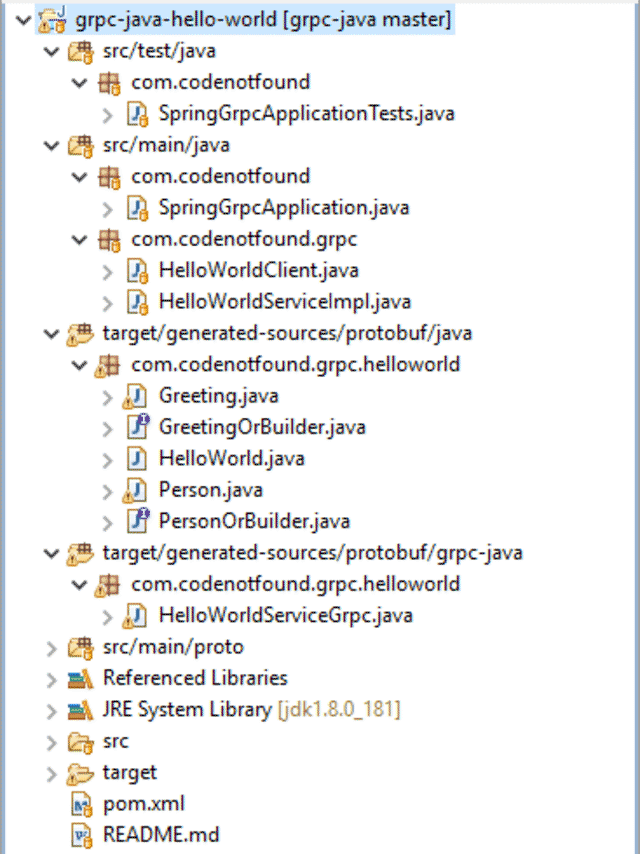
Our project has the following directory structure:
Maven Setup #
We build and run our example using Maven. If not already the case make sure to download and install Apache Maven.
Shown below is the XML representation of our Maven project in a POM file. It contains the needed dependencies for compiling and running the example.
In order to configure and expose the Hello World gRPC service endpoint, we will use the Spring Boot project.
To facilitate the management of the different Spring dependencies, Spring Boot Starters are used. These are a set of convenient dependency descriptors that you can include in your application.
We include the spring-boot-starter-web dependency which automatically sets up an embedded Apache Tomcat that will host our gRPC service endpoint.
The spring-boot-starter-test includes the dependencies for testing Spring Boot applications with libraries that include JUnit, Hamcrest and Mockito.
The Spring boot starter for gRPC framework auto-configures and runs an embedded gRPC server with @GRpcService enabled Beans as part of a Spring Boot application. The starter supports both Spring Boot version 1.5.X and 2.X.X. We enable it by including the grpc-spring-boot-starter dependency.
Protocol buffers support generated code in a number of programming languages. This tutorial focuses on Java.
There are multiple ways to generate the protobuf-based code and in this example we will use the protobuf-maven-plugin as documented on the grpc-java GitHub page.
We also include the os-maven-plugin extension that generates various useful platform-dependent project properties. This information is needed as the Protocol Buffer compiler is native code. In other words, the protobuf-maven-plugin needs to fetch the correct compiler for the platform it is running on.
Finally, the plugins section includes the spring-boot-maven-plugin. This allows us to build a single, runnable uber-jar. This is a convenient way to execute and transport our code. Also, the plugin allows us to start the example via a Maven command.
<?xml version="1.0" encoding="UTF-8"?>
<project xmlns="http://maven.apache.org/POM/4.0.0" xmlns:xsi="http://www.w3.org/2001/XMLSchema-instance"
  xsi:schemaLocation="http://maven.apache.org/POM/4.0.0 http://maven.apache.org/xsd/maven-4.0.0.xsd">
  <modelVersion>4.0.0</modelVersion>

  <groupId>com.codenotfound</groupId>
  <artifactId>grpc-java-hello-world</artifactId>
  <version>0.0.1-SNAPSHOT</version>
  <packaging>jar</packaging>

  <name>grpc-java-hello-world</name>
  <description>gRPC Java Example</description>
  <url>https://codenotfound.com/grpc-java-example.html</url>

  <parent>
    <groupId>org.springframework.boot</groupId>
    <artifactId>spring-boot-starter-parent</artifactId>
    <version>2.1.0.RELEASE</version>
    <relativePath /> <!-- lookup parent from repository -->
  </parent>

  <properties>
    <project.build.sourceEncoding>UTF-8</project.build.sourceEncoding>
    <project.reporting.outputEncoding>UTF-8</project.reporting.outputEncoding>
    <java.version>1.8</java.version>
    <grpc-spring-boot-starter.version>3.0.0</grpc-spring-boot-starter.version>
    <os-maven-plugin.version>1.6.1</os-maven-plugin.version>
    <protobuf-maven-plugin.version>0.6.1</protobuf-maven-plugin.version>
  </properties>

  <dependencies>
    <dependency>
      <groupId>org.springframework.boot</groupId>
      <artifactId>spring-boot-starter-web</artifactId>
    </dependency>
    <dependency>
      <groupId>io.github.lognet</groupId>
      <artifactId>grpc-spring-boot-starter</artifactId>
      <version>${grpc-spring-boot-starter.version}</version>
    </dependency>
    <dependency>
      <groupId>org.springframework.boot</groupId>
      <artifactId>spring-boot-starter-test</artifactId>
      <scope>test</scope>
    </dependency>
  </dependencies>

  <build>
    <extensions>
      <extension>
        <groupId>kr.motd.maven</groupId>
        <artifactId>os-maven-plugin</artifactId>
        <version>${os-maven-plugin.version}</version>
      </extension>
    </extensions>
    <plugins>
      <plugin>
        <groupId>org.springframework.boot</groupId>
        <artifactId>spring-boot-maven-plugin</artifactId>
      </plugin>
      <plugin>
        <groupId>org.xolstice.maven.plugins</groupId>
        <artifactId>protobuf-maven-plugin</artifactId>
        <version>${protobuf-maven-plugin.version}</version>
        <configuration>
          <protocArtifact>com.google.protobuf:protoc:3.5.1-1:exe:${os.detected.classifier}</protocArtifact>
          <pluginId>grpc-java</pluginId>
          <pluginArtifact>io.grpc:protoc-gen-grpc-java:1.16.1:exe:${os.detected.classifier}</pluginArtifact>
        </configuration>
        <executions>
          <execution>
            <goals>
              <goal>compile</goal>
              <goal>compile-custom</goal>
            </goals>
          </execution>
        </executions>
      </plugin>
    </plugins>
  </build>

</project>
The protobuf-maven-plugin will generate Java artifacts for the HelloWorld.proto file located in src/main/proto/ (this is the default location the plugin uses).
Execute following Maven command, and the different message and service classes should be generated under target/generated-sources/protobuf/.
mvn compile
Spring Boot Setup #
Create a SpringGrpcApplication that contains a main() method that uses Spring Boot’s SpringApplication.run() method to bootstrap the application, starting Spring.
Note that
@SpringBootApplicationis a convenience annotation that adds:@Configuration,@EnableAutoConfiguration, and@ComponentScan.
For more information on Spring Boot, we refer to the Spring Boot getting started guide.
package com.codenotfound;

import org.springframework.boot.SpringApplication;
import org.springframework.boot.autoconfigure.SpringBootApplication;

@SpringBootApplication
public class SpringGrpcApplication {

  public static void main(String[] args) {
    SpringApplication.run(SpringGrpcApplication.class, args);
  }
}
Creating the Server #
The service implementation is defined in the HelloWorldServiceImpl POJO that implements the HelloWorldServiceImplBase class that was generated from the HelloWorld.proto file.
We override the sayHello() method and generate a Greeting response based on the first and last name of the Person passed in the request.
Note that the response is a
StreamObserverobject. In other words, the service is by default asynchronous. Whether you want to block or not when receiving the response(s) is the decision of the client as we will see further below.
We use the response observer’s onNext() method to return the Greeting and then call the response observer’s onCompleted() method to tell gRPC that we’ve finished writing responses.
The HelloWorldServiceImpl POJO is annotated with @GRpcService which auto-configures the specified gRPC service to be exposed on port 6565.
package com.codenotfound.grpc;

import org.lognet.springboot.grpc.GRpcService;
import org.slf4j.Logger;
import org.slf4j.LoggerFactory;
import com.codenotfound.grpc.helloworld.Greeting;
import com.codenotfound.grpc.helloworld.HelloWorldServiceGrpc;
import com.codenotfound.grpc.helloworld.Person;
import io.grpc.stub.StreamObserver;

@GRpcService
public class HelloWorldServiceImpl
    extends HelloWorldServiceGrpc.HelloWorldServiceImplBase {

  private static final Logger LOGGER =
      LoggerFactory.getLogger(HelloWorldServiceImpl.class);

  @Override
  public void sayHello(Person request,
      StreamObserver<Greeting> responseObserver) {
    LOGGER.info("server received {}", request);

    String message = "Hello " + request.getFirstName() + " "
        + request.getLastName() + "!";
    Greeting greeting =
        Greeting.newBuilder().setMessage(message).build();
    LOGGER.info("server responded {}", greeting);

    responseObserver.onNext(greeting);
    responseObserver.onCompleted();
  }
}
Creating the Client #
The client code is specified in the HelloWorldClient class.
We annotate the client with @Component which will cause Spring to automatically create and import below bean into the container if automatic component scanning is enabled (adding the @SpringBootApplication annotation to the main SpringWsApplication class is equivalent to using @ComponentScan).
To call gRPC service methods, we first need to create a stub.
There are two types of stubs available:
- A blocking/synchronous stub that will wait for the server to respond
- A non-blocking/asynchronous stub that makes non-blocking calls to the server, where the response is returned asynchronously.
In this example, we will implement a blocking stub.
In order to transport messages, gRPC uses http/2 and some abstraction layers in between. This complexity is hidden behind a MessageChannel that handles the connectivity. The general recommendation is to use one channel per application and share it among service stubs.
We use an init() method annotated with @PostConstruct in order to build a new MessageChannel right after the after the bean has been initialized. The channel is then used to create the helloWorldServiceBlockingStub stub.
gRPC by default uses a secure connection mechanism such as TLS. As this is a simple development test will use
usePlaintext()in order to avoid having to configure the different security artifacts such as key/trust stores.
The sayHello() method creates a Person object using the Builder pattern on which we set the 'firstname' and 'lastname' input parameters.
The helloWorldServiceBlockingStub is then used to send the request towards the Hello World gRPC service. The result is a Greeting object from which we return the containing message.
package com.codenotfound.grpc;

import javax.annotation.PostConstruct;
import org.slf4j.Logger;
import org.slf4j.LoggerFactory;
import org.springframework.stereotype.Component;
import com.codenotfound.grpc.helloworld.Greeting;
import com.codenotfound.grpc.helloworld.HelloWorldServiceGrpc;
import com.codenotfound.grpc.helloworld.Person;
import io.grpc.ManagedChannel;
import io.grpc.ManagedChannelBuilder;

@Component
public class HelloWorldClient {

  private static final Logger LOGGER =
      LoggerFactory.getLogger(HelloWorldClient.class);

  private HelloWorldServiceGrpc.HelloWorldServiceBlockingStub helloWorldServiceBlockingStub;

  @PostConstruct
  private void init() {
    ManagedChannel managedChannel = ManagedChannelBuilder
        .forAddress("localhost", 6565).usePlaintext().build();

    helloWorldServiceBlockingStub =
        HelloWorldServiceGrpc.newBlockingStub(managedChannel);
  }

  public String sayHello(String firstName, String lastName) {
    Person person = Person.newBuilder().setFirstName(firstName)
        .setLastName(lastName).build();
    LOGGER.info("client sending {}", person);

    Greeting greeting =
        helloWorldServiceBlockingStub.sayHello(person);
    LOGGER.info("client received {}", greeting);

    return greeting.getMessage();
  }
}
gRPC Java Testing #
Let’s wrap up by creating a basic unit test case in which the above client is used to send a request to the gRPC Hello World service endpoint. We then verify if the response is equal to the expected greeting.
The @RunWith and @SpringBootTest testing annotations, that were introduced with Spring Boot 1.4, are used to tell JUnit to run using Spring’s testing support and bootstrap with Spring Boot’s support.
The HelloWorldClient Bean is auto-wired so we can use it in the test case. The service itself is automatically started by the @SpringBootTest annotation.
All that is left to do is to compare the received result to the expected greeting message using an assert statement.
package com.codenotfound;

import static org.assertj.core.api.Assertions.assertThat;
import org.junit.Test;
import org.junit.runner.RunWith;
import org.springframework.beans.factory.annotation.Autowired;
import org.springframework.boot.test.context.SpringBootTest;
import org.springframework.test.context.junit4.SpringRunner;
import com.codenotfound.grpc.HelloWorldClient;

@RunWith(SpringRunner.class)
@SpringBootTest
public class SpringGrpcApplicationTests {

  @Autowired
  private HelloWorldClient helloWorldClient;

  @Test
  public void testSayHello() {
    assertThat(helloWorldClient.sayHello("John", "Doe"))
        .isEqualTo("Hello John Doe!");
  }
}
Run the above test case. Open a command prompt in the projects root folder and execute following Maven command:
mvn test
The result should be a successful build during which the gRPC server is started and a call is made to the Hello World service.
.   ____          _            __ _ _
/\\ / ___'_ __ _ _(_)_ __  __ _ \ \ \ \
( ( )\___ | '_ | '_| | '_ \/ _` | \ \ \ \
\\/  ___)| |_)| | | | | || (_| |  ) ) ) )
'  |____| .__|_| |_|_| |_\__, | / / / /
=========|_|==============|___/=/_/_/_/
:: Spring Boot ::        (v2.1.0.RELEASE)

2018-11-13 11:43:00.497  INFO 8624 --- [           main] c.c.grpc.SpringGRPCApplicationTests      : Starting SpringGRPCApplicationTests on DESKTOP-2RB3C1U with PID 8624 (started by Codenotfound in C:\Users\Codenotfound\repos\grpc-java\grpc-java-hello-world)
2018-11-13 11:43:00.501  INFO 8624 --- [           main] c.c.grpc.SpringGRPCApplicationTests      : No active profile set, falling back to default profiles: default
2018-11-13 11:43:02.842  INFO 8624 --- [           main] o.s.s.concurrent.ThreadPoolTaskExecutor  : Initializing ExecutorService 'applicationTaskExecutor'
2018-11-13 11:43:03.364  INFO 8624 --- [           main] c.c.grpc.SpringGRPCApplicationTests      : Started SpringGRPCApplicationTests in 3.166 seconds (JVM running for 4.235)
2018-11-13 11:43:03.365  INFO 8624 --- [           main] o.l.springboot.grpc.GRpcServerRunner     : Starting gRPC Server ...
2018-11-13 11:43:03.414  INFO 8624 --- [           main] o.l.springboot.grpc.GRpcServerRunner     : 'com.codenotfound.grpc.server.HelloWorldServiceImpl' service has been registered.
2018-11-13 11:43:03.632  INFO 8624 --- [           main] o.l.springboot.grpc.GRpcServerRunner     : gRPC Server started, listening on port 6565.
2018-11-13 11:43:03.855  INFO 8624 --- [           main] c.c.grpc.client.HelloWorldClient         : client sending first_name: "John"
last_name: "Doe"

2018-11-13 11:43:04.191  INFO 8624 --- [ault-executor-0] c.c.grpc.server.HelloWorldServiceImpl    : server received first_name: "John"
last_name: "Doe"

2018-11-13 11:43:04.191  INFO 8624 --- [ault-executor-0] c.c.grpc.server.HelloWorldServiceImpl    : server responded message: "Hello John Doe!"

2018-11-13 11:43:04.210  INFO 8624 --- [           main] c.c.grpc.client.HelloWorldClient         : client received message: "Hello John Doe!"

[INFO] Tests run: 1, Failures: 0, Errors: 0, Skipped: 0, Time elapsed: 4.78 s - in com.codenotfound.grpc.SpringGRPCApplicationTests
2018-11-13 11:43:04.322  INFO 8624 --- [       Thread-2] o.l.springboot.grpc.GRpcServerRunner     : Shutting down gRPC server ...
2018-11-13 11:43:04.325  INFO 8624 --- [       Thread-2] o.l.springboot.grpc.GRpcServerRunner     : gRPC server stopped.
2018-11-13 11:43:04.325  INFO 8624 --- [       Thread-2] o.s.s.concurrent.ThreadPoolTaskExecutor  : Shutting down ExecutorService 'applicationTaskExecutor'
[INFO]
[INFO] Results:
[INFO]
[INFO] Tests run: 1, Failures: 0, Errors: 0, Skipped: 0
[INFO]
[INFO] ------------------------------------------------------------------------
[INFO] BUILD SUCCESS
[INFO] ------------------------------------------------------------------------
[INFO] Total time: 10.994 s
[INFO] Finished at: 2018-11-13T11:43:05+01:00
[INFO] ------------------------------------------------------------------------
If you just want to start Spring Boot so that the service endpoint is up and running, execute following Maven command:
mvn spring-boot:run
In this tutorial you learned how to implement a gRPC Java service and corresponding client using Spring Boot and Maven.
If you liked this example or have a question you would like to ask:
Leave a comment below.
Thanks!